At what height is it safest to run electrical cables?
Electrical cables, the silent workhorses coursing behind our walls, are the unseen arteries of a modern building, transmitting the lifeblood of power that keeps our lights on, appliances humming, and devices charged. Ensuring their safety and functionality is paramount for a comfortable and hazard-free living environment. But a crucial question plagues both seasoned electricians and curious DIYers embarking on electrical projects: at what height is it safest to run electrical cables within walls? While there’s no single, magical answer, strategic cable placement is the cornerstone of a safe and well-functioning electrical system. This guide delves into the intricacies of in-wall cable placement, exploring industry standards, practical considerations, and best practices to illuminate the path towards a successful electrical project.
The Balancing Act: Safety Regulations and Practical Considerations
Running electrical cables within walls isn’t a free-for-all. A delicate balance exists between adhering to safety regulations and ensuring the functionality of your electrical system. Understanding these considerations empowers you to approach electrical projects with confidence.
-
The National Electrical Code (NEC): This ubiquitous document, published by the National Fire Protection Association (NFPA), serves as the national benchmark for safe electrical wiring practices in the United States. The NEC outlines specific requirements for cable placement heights, including minimum clearances from floors and ceilings for outlets and switches. These regulations are established to minimize the risk of electrical hazards and ensure the longevity of your electrical system. Thinking of the NEC as a blueprint for electrical safety is a helpful analogy.
-
Local Variations: Don’t be surprised if your municipality has its own building code that supplements or modifies the NEC. These local codes often address regional considerations or specific electrical safety concerns, like flood zones or historical building preservation. Always check with your local building department to ensure your electrical project adheres to all applicable regulations. Obtaining the necessary permits before commencing any electrical work is paramount, as inspections by qualified professionals can identify potential issues and prevent costly rework.
-
Accessibility for Future Needs: While safety is the top priority, functionality shouldn’t be neglected. Running cables at a reasonable height, typically between 14 and 18 inches from the floor for outlets, ensures easy access for future maintenance and modifications. Imagine needing to replace a malfunctioning outlet or add a new one in the future. Strategic cable placement allows for these eventualities without excessive wall cutting or damage. However, prioritizing safety always takes precedence. If maintaining the recommended height for outlets in a specific location creates a conflict with structural elements, consulting a qualified electrician is crucial to determine the safest and most code-compliant solution.
Translating Code into Action: Recommended Heights for Common Electrical Components
The NEC provides specific minimum heights for outlets and switches to ensure both safety and ease of use:
-
Powering Your Devices: Receptacles (outlets) generally require a placement between 12 and 18 inches above the finished floor. This positioning keeps them readily accessible for plugging in appliances and electronics while minimizing the risk of electrical shock or damage from accidental contact, particularly for children.
-
Illuminating Your Space: Light switches, on the other hand, typically need to be installed between 48 and 60 inches from the finished floor. This placement aligns with the natural elbow height of most adults, promoting comfortable and effortless switch activation. Following these NEC guidelines ensures your electrical system not only functions seamlessly but also adheres to safety regulations.
-
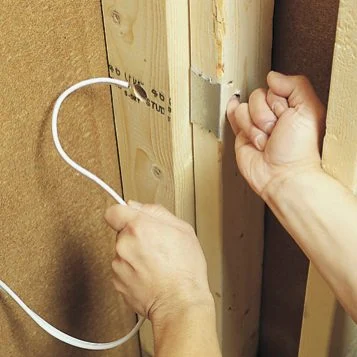
Avoiding Conflicts: Maintaining a minimum distance (usually around 1 ¼ inches) between cables and wall studs where nails or screws might be driven minimizes the risk of damaging wires and creating electrical hazards. Imagine hanging a picture and accidentally puncturing a live cable hidden within the wall. Maintaining this recommended clearance between cables and studs safeguards against such mishaps.
Beyond the Numbers: Practical Tips for Safe and Efficient Cable Placement
Knowing the theory is essential, but successful execution hinges on practical application. Here are some tips to translate strategic cable placement into reality:
-
Utilizing Technology for Precision: Before drilling or hammering a single nail into your wall, locate the underlying studs. Stud finders, both electronic and manual varieties, are invaluable tools to ensure you avoid drilling into critical structural elements or accidentally damaging existing electrical wires. Once you’ve identified the studs, use a marking tool to outline the path for your cables, promoting precision and minimizing the risk of mistakes. Think of these tools as your roadmap for safe and efficient cable placement.


Post Comment